When I was working at the day job, a whiteboard was a mandatory piece of office equipment. In my company, every cubicle and corner office had one. And they were well used for keeping track of the 101 projects that were due or for brainstorming. Well, now that I have my own at-home corner office (in the corner of my bedroom, BTW), I need a whiteboard. But whiteboards are... no other way to put it than UGLY! Especially in a bedroom.
So what to do?
I was inspired by an article in
"Where Women Create" (great magazine if you haven't seen it). One artist used French doors to cover an ugly wall in her basement studio. It was right up my alley and the inspiration for today's blog...
First, a couple of things about why I think this is such a great idea. First, whiteboard markers work better on glass than whiteboard. Really. The marker wipes right off the glass and doesn't leave those streaking, ugly marks that need a nasty smelling chemical cleaner. Then, they're just... pretty. I love old things and repurposing them. And besides, my hubby and I have hauled home a number of old windows and it doesn't look like we're going to be using them anytime soon for a studio/greenhouse/shed/??
Converting an old window into a whiteboard is a super easy Flea Market-to-treasure idea. It didn't take hubby and me more than a hour to complete and half that time was cleaning the old window.
Grubby, huh. This is the window we decided to use. Mostly because it fit in to the tight space I have in the bedroom. First thing was cleaning and that took a lot of Windex and paper towels. Next, I checked to make sure the windows were still tight in their frame. If not, I would have had to fix that with glass putty. Since you'll writing directly on the glass, you want to make sure it will stay in place.
I didn't do anything to the window, but clean it. If the paint were more chippy, I might have varnished to encase the paint (an especially good idea with lead paints). I don't have the kidlets up here that often, so I'm not worried about that.
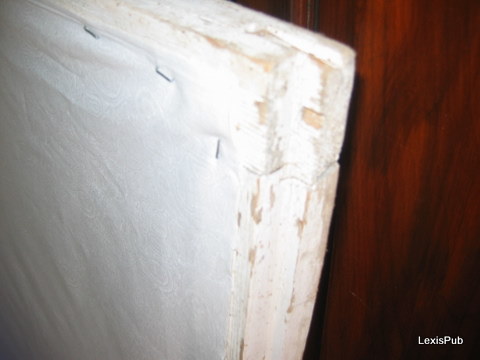
Then it was just a matter of stapling fabric to the back of the window. I opted to go "white" with a hint of print. I don't know if you can tell from the photo, but the fabric is a paisley tone-on-tone. It's a little more than just plain white fabric, but it's doesn't distract from its purpose. I was afraid the writing wouldn't show up against dark or big prints fabric. You could use other colors, of course, or even paint the windows with whiteboard paint. There's many different options here.
I called in some support when it came time to hanging up my new whiteboard. Not only is a second pair of hands necessary, but I wanted to make sure it stays on the wall. Hubby searched for the stud locations, made all the appropriate calculations on the window and pre-drilled holes.
Then it was a matter of hanging it up. Sorry, I don't have photos of the actually hanging, because it took both of us to handle the window. It's hung with two screws at the top and two at the bottom into the wall studs. It's not going anywhere. The only thing I haven't done yet is cover of the screw heads. I just need to dab those with paint (or maybe whiteout, it is an office, after all).
I also hung up an old tin basket next to my new whiteboard to hold whiteboard markers and an eraser. Works well.
A whiteboard comes in handy for so many things when you work from home. It of course, helps me keep track of projects and tasks that are due.
Add affirmations I leave to myself (I try to change out the quotes and words often).
Or just doodle when I feel creative.
Overall, I'm happy with the way my whiteboard flea market makeover went. I repurposed an old window that was collecting dust in the bar and got a useful piece of office equipment (with a lot of style).
Let me know how you like it and what flea market makeovers you attempted.
Linking to Cindy's Show and Tell at

When I was working at the day job, a whiteboard was a mandatory piece of office equipment. In my company, every cubicle and corner office had one. And they were well used for keeping track of the 101 projects that were due or for brainstorming. Well, now that I have my own at-home corner office (in the corner of my bedroom, BTW), I need a whiteboard. But whiteboards are... no other way to put it than UGLY! Especially in a bedroom.
So what to do?
I was inspired by an article in
"Where Women Create" (great magazine if you haven't seen it). One artist used French doors to cover an ugly wall in her basement studio. It was right up my alley and the inspiration for today's blog...
First, a couple of things about why I think this is such a great idea. First, whiteboard markers work better on glass than whiteboard. Really. The marker wipes right off the glass and doesn't leave those streaking, ugly marks that need a nasty smelling chemical cleaner. Then, they're just... pretty. I love old things and repurposing them. And besides, my hubby and I have hauled home a number of old windows and it doesn't look like we're going to be using them anytime soon for a studio/greenhouse/shed/??
Converting an old window into a whiteboard is a super easy Flea Market-to-treasure idea. It didn't take hubby and me more than a hour to complete and half that time was cleaning the old window.
Grubby, huh. This is the window we decided to use. Mostly because it fit in to the tight space I have in the bedroom. First thing was cleaning and that took a lot of Windex and paper towels. Next, I checked to make sure the windows were still tight in their frame. If not, I would have had to fix that with glass putty. Since you'll writing directly on the glass, you want to make sure it will stay in place.
I didn't do anything to the window, but clean it. If the paint were more chippy, I might have varnished to encase the paint (an especially good idea with lead paints). I don't have the kidlets up here that often, so I'm not worried about that.
Then it was just a matter of stapling fabric to the back of the window. I opted to go "white" with a hint of print. I don't know if you can tell from the photo, but the fabric is a paisley tone-on-tone. It's a little more than just plain white fabric, but it's doesn't distract from its purpose. I was afraid the writing wouldn't show up against dark or big prints fabric. You could use other colors, of course, or even paint the windows with whiteboard paint. There's many different options here.
I called in some support when it came time to hanging up my new whiteboard. Not only is a second pair of hands necessary, but I wanted to make sure it stays on the wall. Hubby searched for the stud locations, made all the appropriate calculations on the window and pre-drilled holes.
Then it was a matter of hanging it up. Sorry, I don't have photos of the actually hanging, because it took both of us to handle the window. It's hung with two screws at the top and two at the bottom into the wall studs. It's not going anywhere. The only thing I haven't done yet is cover of the screw heads. I just need to dab those with paint (or maybe whiteout, it is an office, after all).
I also hung up an old tin basket next to my new whiteboard to hold whiteboard markers and an eraser. Works well.
A whiteboard comes in handy for so many things when you work from home. It of course, helps me keep track of projects and tasks that are due.
Add affirmations I leave to myself (I try to change out the quotes and words often).
Or just doodle when I feel creative.
Overall, I'm happy with the way my whiteboard flea market makeover went. I repurposed an old window that was collecting dust in the bar and got a useful piece of office equipment (with a lot of style).
Let me know how you like it and what flea market makeovers you attempted.
Linking to Cindy's Show and Tell at